
/sdk/firstadapter
Create A Simple Adapter
You must start Visual Studio in Administrative mode in order to debug your adapter.
New Project in Visual Studio
Before you can write your first adapter you must have followed the installation procedures.
- Start Visual Studio in Administrative mode
-
Create a new Project
- Select File -> New Project
- Choose Enzo Unified DataAdapter from the list of available project types
-
Enter a name for the project (ex: ServerInfo) and the path where the project will be stored;
the path should be under a folder that is the name of your namespace (a short name that is unique to you).
The Blue Syntax Consulting namespace is BSC, so the path could be set to:
C:\Program Files\Enzo Unified SDK\Adapters\BSC\ - Uncheck the "Create a Subdirectory for Solution" option
- The .NET Framework should be set to 4.6.1 or higher
-
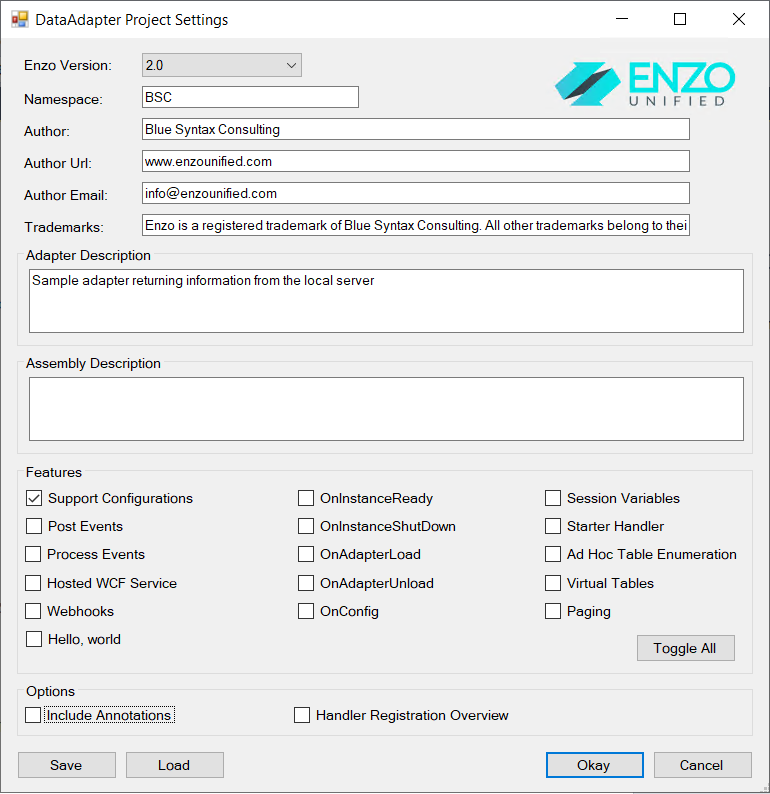
Enter the project settings for your adapter; select the Supports Configuration option and click Okay.
- Make sure your project compiles, and that you can run the adapter by pressing F5; check the troubleshooting section of the installation document if you experience any issues
Add Configuration Settings
The first step is to define configuration settings for this adapter. Configuration Settings are used by the adapter
to retrieve secrets (such as API Keys) or default settings (such as RetryCount) that the adapter will observe.
Adding configuration settings for an adapter is optional; however it is highly recommended to use these settings
instead of hard-coding adapter settings in your code.
The RegisterConfig() method
defines the settings that can be defined for the adapter and should be called inside the
RegisterAdapter() method which is automatically added to your adapter code.
Since we selected the Supports Configuration option earlier when we created the adapter project, you will see the
RegisterConfig() method in your adapter already added with a few properties. Our sample adapter will be using different
properties, so replace the RegisterConfig() line with this:
                RegisterConfig(
                "defaultPath|The default path to use when none is specified"
                );
The above call defines a defaultPath property as a configuration setting. Since no data type was provided for defaultPath,
the string data type is assumed. This property has no default value, and is not required. You can add as many configuration
settings as you need.
You can specify a default value for a config setting and make it a required setting.
The general declaration syntax is as follows:
type varName|description|defaultVal|r
If you want to set the defaultPath property to C:\ and make it a required property, it would look like this:
                RegisterConfig(
                "defaultPath|The default path to use when none is specified|c:\|r"
                );
or with the data type:
                RegisterConfig(
                "string defaultPath|The default path to use when none is specified|c:\|r"
                );
Add a Handler
Let's define a handler for this adapter called GetFiles. This handler will return the list of files available under the
path provided (or the defaultPath), along with basic file properties. Handlers are also defined inside the RegisterAdapter()
method.
There are many advanced options available when declaring a handler. This section provides a high level overview, and a simple registration example.
The general format for declaring a handler is as follows:
                RegisterHandler("procName,tableName|groupName",

                  HandlerOptions,

                  "description",

                  new[] { "SQLexample1", "SQLexample2" },

                  methodName,

                  new[] { "field1", "field2" },

                  new[] { "col1", "col2" }

                );
Handler Name
The name of the handler defines how it will be called by end users. The procName refers to a Stored Procedure name or a REST endpoint name. The tableName is optional, and represents the name of the handler as a Table. In other words the handler can be called using EXEC procName, or SELECT .. FROM tableName, UPDATE tableName..., DELETE FROM tableName and INSERT INTO tableName.The tableName and groupName arguments are both optional.
-
tableName: used when a name other than the Stored Procedure name shoul be used when
SELECT, UPDATE, DELETE and INSERT operations are allowed on the handler.
- groupName: used to group handlers by functional area so that they are displayed as a group when using the built-in EXEC adapterName.help method. Has no functional purpose.
Examples of valid handler names:
| Handler name | Proc Name | Table Name | Handler Group |
| GetHiddenFiles | GetHiddenFiles | ||
| GetFiles,Files | GetFiles | Files | |
| UpdateDocument,documents | UpdateDocument | documents | |
| DeleteDocument,documents|Document | DeleteDocument | documents | Document |
NOTE: You can create as many handlers as you want; however handler names must be unique by operation. In other
words you can only have one handler name for an EXEC command; but you can have multiple identical tableName defined
(one per table operation as defined by the HandlerOptions).
Handler Options
Handler Options define how a handler can be called. By default all handlers can be called as an EXEC operation.See the Handler Options section for a list of supported values.
Add the GetFiles Handler
The following code creates the GetFiles handler, using Files as the table name for the handler, and making it available as a SELECT operation.
RegisterHandler(
    "GetFiles,Files",
    HandlerOptions.Select | HandlerOptions.HttpGET ,
    "Gets files from a local directory or from a UNC path",
    new[] { "EXEC ServerInfo.GetFiles 'c:\'", "SELECT * FROM ServerInfo.Files WHERE path='c:\'" },
    GetFiles,
    new[] {
        "string path|The path to inspect"
    },
    new[]
    {
        "path|The path of the file",
        "fullName|The full path to the file including the file name",
        "long size|File size in bytes",
        "bool directory|True for a directory"
    }
);
Once the above hander has been defined, all you need is to implement the GetFiles method in the adapter class. An explanation of the code is provided as part of comments in the code below.
private EventResult GetFiles(object sender, ExecEventArgs e)
{
    // Create a EventResult object which is what we will return from this method
    EventResult res = new EventResult(e);

    // Get the path as provided as an argument; if null, look for the configuration setting property called defaultPath
    // If all fails, assume c:\ as the default path to look into
    string path = e.GetArg("path") ?? e.GetSetting("defaultPath", @"c:\");

    // If argument validation is all we need, exit now. Don't do the work.
    if (e.IsArgValidation)
        return res;

    // Get the list of files as requested including folders
    // We could expand the handler to also accept the search pattern, and if the search should be recursive.
    string[] files = System.IO.Directory.GetFileSystemEntries(path, "*.*", System.IO.SearchOption.TopDirectoryOnly);

    foreach(string file in files)
    {
        // Add a record for each returned item; break if we have reached the TOP directive

        // Is this a file?
        if (!System.IO.Directory.Exists(file))
        {
            // Get file information for each file
            var info = new System.IO.FileInfo(file);

            // Add the file now using the AddResultRow method
            // This method returns false if we have reached the number of maximum records requested
            // or if the caller cancelled the query
            if (!res.AddResultRow(path, file, info.Length, false))
                break;
        }
        else
        {
            // Add the directory to the result
            // Specify a NULL value using DBNull.Value
            if (!res.AddResultRow(path, file, DBNull.Value, true))
                break;
        }
    }

    // Return the result to the base adapter
    return res;
}
Test the Adapter
Before running the adapter, the source code should look like this:
using System;
using BSC.Enzo.Unified;
using BSC.Enzo.Unified.Logging;

namespace BSC
{
    public partial class ServerInfo : DataAdapter
    {
        #region DataAdapter overrides
        public override void RegisterAdapter()
        {
            #region Descriptive details
            Title = "ServerInfo";
            Description = "Sample adapter returning information from the local server";
            Author = "Blue Syntax Consulting";
            AuthorCopyright = "Copyright (c) 2020 Blue Syntax Consulting. All Rights Reserved.";
            AuthorUrl = "www.enzounified.com";
            AuthorEmail = "info@enzounified.com";
            LogSeverityThreshold = Severity.Debug;
            #endregion


            #region Register any configuration variables that can be referenced by your DataAdapter (optional)
            RegisterConfig(
                    "defaultPath|The default path to use when none is specified"
                );
            #endregion

            RegisterHandler(
                "GetFiles,Files",
                HandlerOptions.Select | HandlerOptions.HttpGET ,
                "Gets files from a local directory or from a UNC path",
                new[] { "" },
                GetFiles,
                new[] {
                    "string path|The path to inspect"
                },
                new[]
                {
                    "path|The path of the file",
                    "fullName|The full path to the file including the file name",
                    "long size|File size in bytes",
                    "bool directory|True for a directory"
                }
                );

        }
        #endregion

        private EventResult GetFiles(object sender, ExecEventArgs e)
        {
            EventResult res = new EventResult(e);

            // Get the path
            string path = e.GetArg("path") ?? e.GetSetting("defaultPath", @"c:\");

            if (e.IsArgValidation)
                return res;

            string[] files = System.IO.Directory.GetFileSystemEntries(path, "*.*", System.IO.SearchOption.TopDirectoryOnly);

            foreach(string file in files)
            {
                // Add a record for each returned item; break if we have reached the TOP directive

                if (!System.IO.Directory.Exists(file))
                {
                    // Get file information for each file
                    var info = new System.IO.FileInfo(file);

                    if (!res.AddResultRow(path, file, info.Length, false))
                        break;
                }
                else
                {
                    // Add directory
                    if (!res.AddResultRow(path, file, DBNull.Value, true))
                        break;
                }
            }

            return res;
        }

    }
}
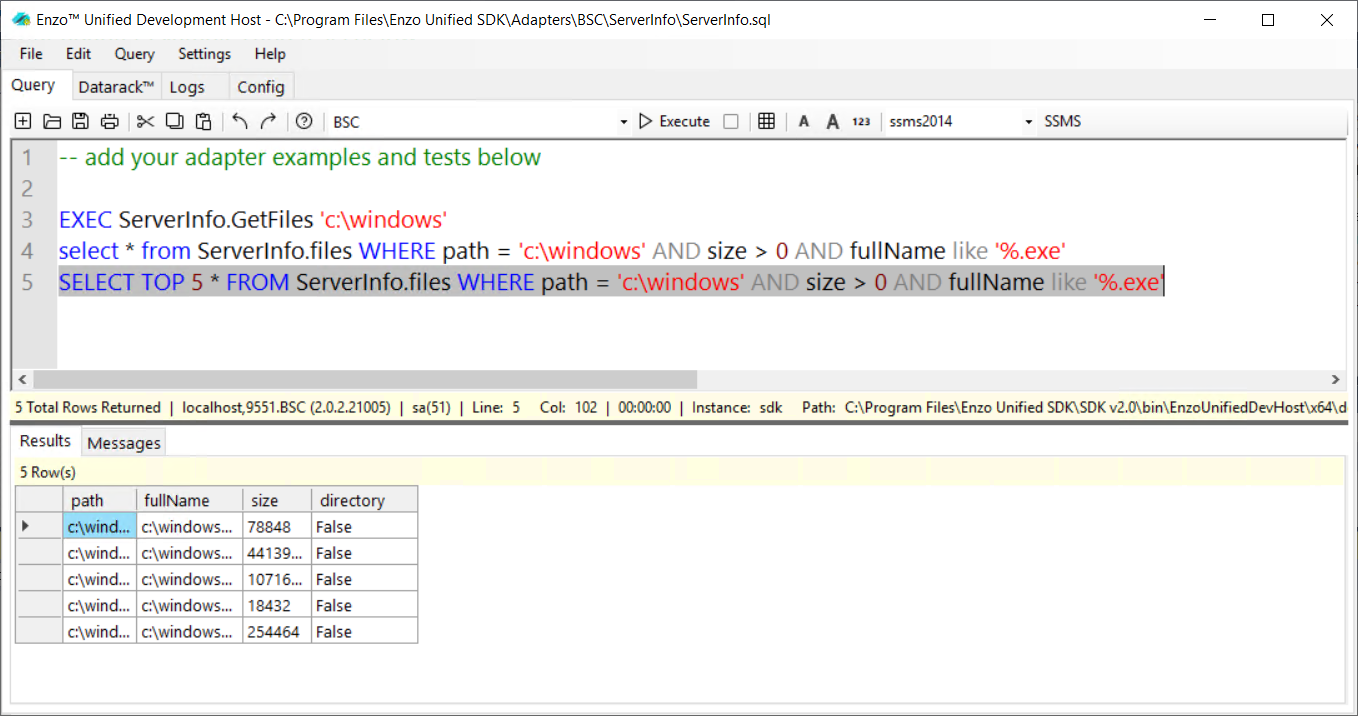
You can now run the adapter by pressing F5. The DevHost may take a minute or two to start. Once it has started, type the following SQL commands to test your handler:
            EXEC ServerInfo.GetFiles 'c:\Windows'

            SELECT * FROM ServerInfo.Files WHERE path = 'c:\windows'

            SELECT TOP 5 * FROM ServerInfo.files WHERE path = 'c:\windows' AND size > 0 AND fullName like '%.exe'
As you can see above, the SQL command is more flexible because you can specify the TOP operator, and provide a WHERE clause the provides the path argument, but also provides a filter on the data returned. The AddResultRow automatically performs the TOP and filtering capability for you.